 |
|
||||||
| Product Photography Tips | |
|
Cameras tend to underexpose images when capturing subjects with white or very light backgrounds. The proper way to prevent dark, underexposed images is to use manual exposure and adjust your shutter speed. Most digital cameras have fairly easy-to-access exposure compensation controls (labeled as "EV" for Exposure Value). If your images are too dark, try adjusting the exposure compensation. A setting of +1 is a good place to start. If you end up setting the EV too high, the image will appear "washed out". Simply go back step or two until the exposure looks right. Clicking on the different EV settings below
demonstrates how changing a camera's exposure compensation setting can avoid
exposure problems. In this example shot against a white background, the
standard setting of
0 is too dark. An EV setting of
+1.3
seems best for this shot. |
|
| EV = -2 | EV = -1 | EV = 0 | EV = +1 | EV = +1.3 | EV = +1.6 | EV = +2 |
|
(Move your cursor over on an EV setting to see the effect it had on the image). |
||||||
2) Use a tripod, even the slightest movement while taking a picture will cause motion blur. The closer you get to an object the more obvious the motion blur becomes. Even an inexpensive tripod will make a big difference in the sharpness of your images. For really sharp images it makes sense to invest in a good, sturdy tripod. If your camera has a remote shutter release then use it, if not then use the camera's built-in timer to minimize camera shake. 3) To get the largest area of your subject in focus put your camera in aperture priority mode and set the aperture to the highest number possible. The closer you get to your subject the more important this becomes. 4) Use soft lighting. Your camera's built-in flash will rarely give good results for product photography. For soft lighting either shoot outside on an overcast day or use a light tent like the EZcube®, or use a soft box. 5) Use image editing software. Even inexpensive software like Photoshop Elements™ can make your product photography much easier. It may seem like it's faster to use an image exactly as it was shot. But in reality, it is difficult to shoot an image precisely how you would like it to appear in it's final form. Image editing software allows you to crop an image, adjust it's exposure, sharpen the image and then resize it, often in less than 60 seconds. The biggest difference between an amateur's product snapshot and a professional's product image are sharpness and lighting. Steps 1,2, and 3, will improve the sharpness of your images while Step 4 will improve your lighting. A minute spent editing an image will improve it further. Because these few steps seem so basic, it's tempting to ignore them. However, if you take the time to follow them, you will see a huge improvement in the quality of your images. |
|
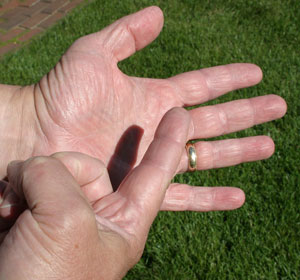
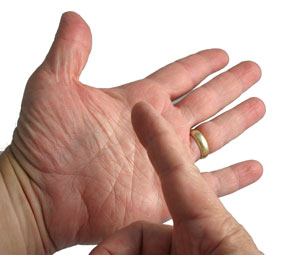
Hold your left hand out, keep it flat and slightly in
front of you. Now hold a finger from your right hand a few inches above
your left hand. Take a look at the shadow cast by your finger. A
hard shadow indicates you
have hard light conditions, a soft shadow means that the lighting is soft. |
|
|
|
|
|
Direct sunlight produces a hard shadow |
Soft light inside a light tent produces a soft shadow |
| Once you have tried this a few times you will see that you can even tell how soft or hard the light is. And if you look carefully you will even be able to tell if the light is actually coming from multiple sources. |
|
 |
 |
|
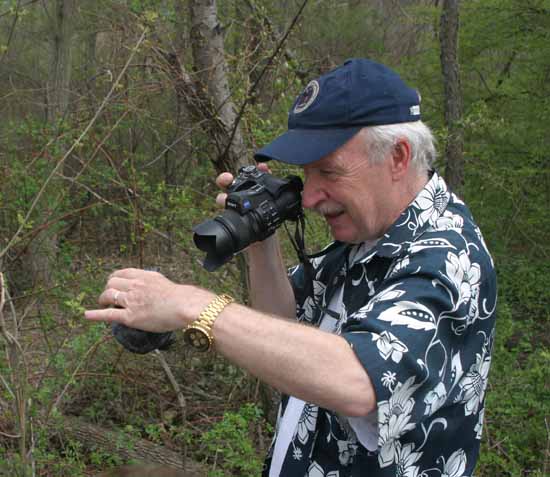
Famous nature photographer Dennis Curtin gets up close and personal with a turtle |
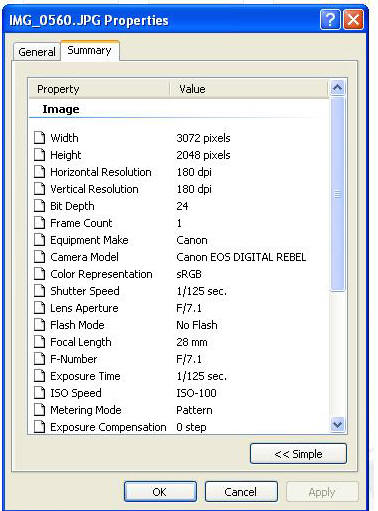
Summary of the image's Properties contains important information about how the image was taken |
|
|
|
|
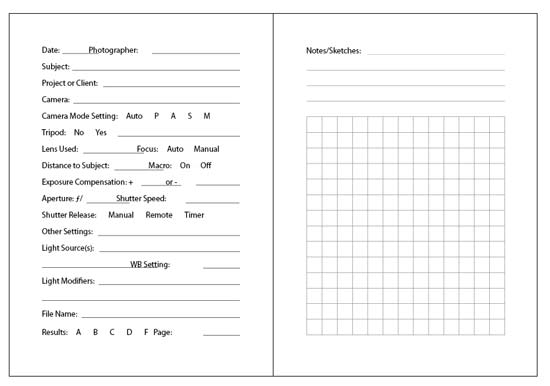
Use a "pre-flight checklist" or photography log |
|
|
Use a formal
digital
photography log or create your own checklist on a pad of paper. This checklist, or log, will help you to improve your photography. The purpose is to help you to recall the lighting conditions, equipment, and settings used for a particular image. This information is invaluable when recreating a certain image at a later date or when reproducing an effect long after the original shot was taken. Use it to review the conditions that led to “good” or “bad” images. Even if you don’t fill in a log for every shot, a log is useful as a pre-flight checklist to ensure that you’re paying attention to everything that will have an impact on your shot. The settings and conditions listed have a significant effect on the quality of an image. |
 |
)
)
)
)
)
)
)